Adding Airports

The first thing you should do is determine which airports you are going to operate at. To do that, go to the Airport Operations Page in the Navigation Menu.

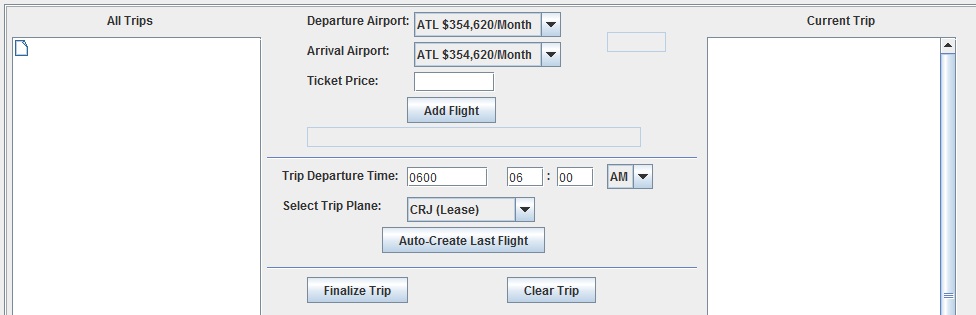
When you go to the Airport Operations Page, you will see something similar to this:

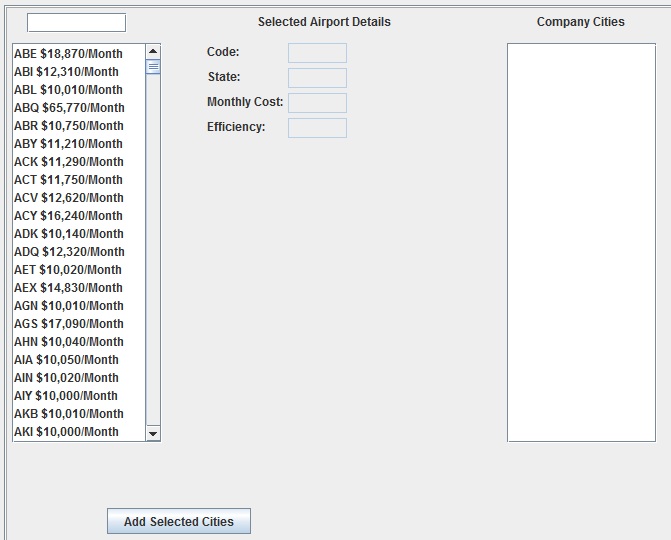
There are lots of things you can do on this page to manage your airports. The list on the left side contains all of the possible airports you can fly to and from. Each airport has a Code (IATA Code), a State, a Monthly Cost, and an Efficiency. Above the list of airports is a text box. If you want to search for an airport, just type the airport's IATA Code. For this example, let's look at Atlanta Internation Airport, whose IATA Code is ATL.

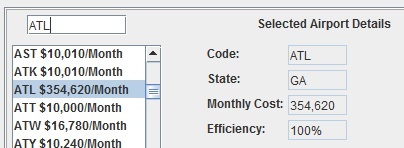
When ATL is selected, its data is displayed in the test fields. Its Code is ATL, its State is GA (Georgia), the Monthly Cost of operating there is $354,620, and its current Efficiency is 100%. The Efficiency is an indicator of how busy the airport is, compared to how much traffic it can support. 100% indicates that ATL currently has significantly less traffic than it can support, which means it is a good airport for us. The Monthly Cost is dependent on how large the airport is. So a very expensive airport is an indication that there is a busy airport, while a very cheap airport is an airport with very little traffic (sometimes only one passenger).

On the right of the screen, there is another list (which is currently empty) which contains a list of all of the airports our company operates at. To add ATL to that list, we simply need to press the "Add Selected Cities" button and it is added to our list. Now, to make a flight, we need an Arrival Airport and a Departure Airport. So we need to add at least one more airport. Let's add "Chicago O'Hare International Airport", whose IATA code is ORD.

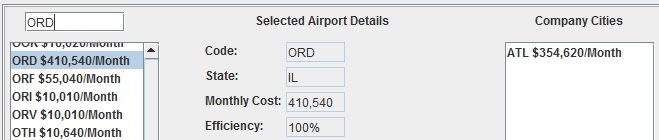
When we search for ORD, this is what we find. ORD's State is IL (Illinois), its Monthly Cost is $410,540, and its Efficiency is 100%. We want to also add this airport to our list, so we do so by pressing the "Add Selected Cities" button.

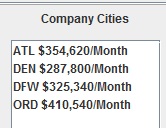
Now that we have two airports, we have enough to make a flight. But, simply flying between Atlanta and Chicago is not going to be enough for us to make a serious profit. To make a serious profit, we need to create Trips, where a Plane will connect several airports with one Flight after another. In this example, we will also add "Denver Internation Airport", whose IATA Code is DEN, and "Dallas/Fort Worth International Airport", whose IATA Code is DFW. So after we add DEN and DFW (by using the same process explained above), we have this in our list of cities:

To learn how to create a Trip from these airports, move on to the section below.

FAQ:
Q: How can I remove an airport from my list?
A: Select the airport in your Company Cities list, and then right-click it. You will have the option to "Delete". Simply press that option and the airport will be removed from your list.

Using Trip Creator

In this section, we are going to create 2 Trips, each with 4 Flights. The first Trip will go from ATL to ORD, then from ORD to DEN, then from DEN to DFW, and then finally from DFW to ATL. The second Trip will go in reverse, from ATL to DFW, then from DFW to DEN, then from DEN to ORD, and then finally from ORD to ATL.

An important rule for creating Trips is that the Trip has to end where it began. For both Trips we will be making, the first Flight begins at ATL, and the last Flight ends at ATL. The first thing we want to do is to go to the Basic Creator Page in the Navigation Menu.

When you go to the Basic Creator Page, you will see a window similar to this:

One the far left side of the screen, there is a small visual tree which has a list of all of your Trips, and all of each Trip's Flights. Since we have not created any Trips yet, this tree is empty. On the far right side of the screen, there is a list which contains all of the Flights in the current Trip we are creating. Since we have not created any Flights yet, this list is empty. In the middle of the screen there are a bunch of text boxes, dropdown boxes, and buttons. We use these elements to create our Trip. There are three sections, which are divided by lines. The top section allows you to create individual Flights. The middle section allows you to set the settings for the entire Trip. And the bottom section allows you to either finalize your Trip, or clear it and start over.

Let's begin by creating a Flight from ATL to ORD. In the Departure Airport box, we select ATL, and in the Arrival Airport box, we select ORD. When we do that, we get this:

When we select ORD, two things automatically happen. First, a field to the right gets colored either Green, Yellow, Red, or Black, and text appears in it. The field indicates to us the "Health" of the Route going from ATL to ORD. "Good" indicates that there is plenty of room to grow in the Route. This is important for us to know, as a Route with poor health will be significantly harder for us to be profitable in. You can read more about Route Health in the Tips and Tricks section of the tutorials. The second thing that happens is the Ticket Price field is given a value. If you already have Flights that go from ATL to ORD, the automatic value that is assigned to this field is the average Ticket Price you have charged for similar Routes. If you have not created any similar Routes, the price is set to $300. For this Flight, we will charge $300, so simply press the "Add Flight" button. When you add the Flight, you will receive a confirmation in the text field below, you will notice a Flight gets added to your Flight list, and the Departure Airport will be set to the Arrival Airport for convience (NOTE: There is currently a bug where the Departure Airport is not always automatically set correctly).

Now, we add the next Flight by changing the Arrival Airport to DEN. For this Flight, we are going to charge $200 for the Ticket Price. Next we add the Flight from DEN to DFW, and charge $250. When that is all done, this is what we have:

Now, the last Flight that we want to add should return the plane to ATL. We can let the program automatically add the last flight by pressing the "Auto-Create Last Flight" button in the middle section.

As you can see, the flight from DFW to ATL was created automatically. Now, at the moment, the Trip starts at 6 AM (ATL Time). Let's say we want to change that so the first Flight (ATL to ORD) takes off at 7 AM instead. There are two ways to set the Departure Time. The first way is with the single box on the left. This box requires a 4 digit number, where the first 2 digits is the hours (on a 24 hour clock) and the last 2 digits is the minutes. The second way is by using the 2 text fields and the drop box, where the first text field is the hours (on a 12 hour clock), the second box is the minutes, and the drop box determines morning or afternoon. When you update either the box on the left or the 3 fields on the right, the other box will update itself accordingly. So when we change the time to 7 AM, this is what we have:

The last thing we need to do before submitting is determine which Plane we want to use. If we already had available Planes, they would show up in the "Select Trip Plane" dropbox. Since we don't have any available Planes, we have to either Lease or Purchase one. You can learn more about the differences between Leasing and Purchasing a Plane in the Tips and Tricks tutorial. Since we only have $500,000 to spend, we will have to Lease. In this example, we will go down and lease a B-73G to use. If you want to learn about all the different types of Planes, go to the Manage Planes Page.

Now that we have set up the Trip, we are ready to finalize it. So we go down and press the "Finalize Trip" button. Since we have chosen to Lease a new Plane, we are shown the following prompt. If we agree with the specifications for the Plane we have chosen, we press the "Yes" button to Finalize the Trip. Otherwise, press the "No" or "Cancel" button to return to your Trip and select a different Plane.

After we press the "Yes" button, our new B-73G is leased, our new Trip is created, and we are ready to create another.

Now let's follow the same procedure to create the second Trip. We will lease another B-73G, and also have the first Flight leave at 7 AM. After we create our second Trip, this is what our Trip Tree looks like:

 
Free Web Hosting