Free Web Hosting

Trip Creation Screen Overview

This screen allows you to create your company's trips. Trips consist of several flights, and one plane. Your flights are how you make revenue in this game. How well you design your trips will determine how profitable your company is. All of the flights in the trip will use the trip's plane. There are several restraints for creating trips and there are many factors to consider when designing the most profitable trips, which we will go into more detail throughout this tutorial. This screen contains a few important features which will allow you to more easily create your trips. We will briefly describe them now, and then go more indepth with them later on this page.

On the left side of the screen is an area named: All Trips. When you have trips for your airline, they will display as a list in this area. You can then expand the trip in the list to view its individual flights. In the middle of the screen is a few fields which will allow you to create or edit your trips. Creating trips is a two-step process: first you need to specify the flights, and then you need to specify the plane for the trip. On the far right is another area named: Current Trip. When you add flights to your trip, those flights will show up as a list in this area.

Creating Your First Flight

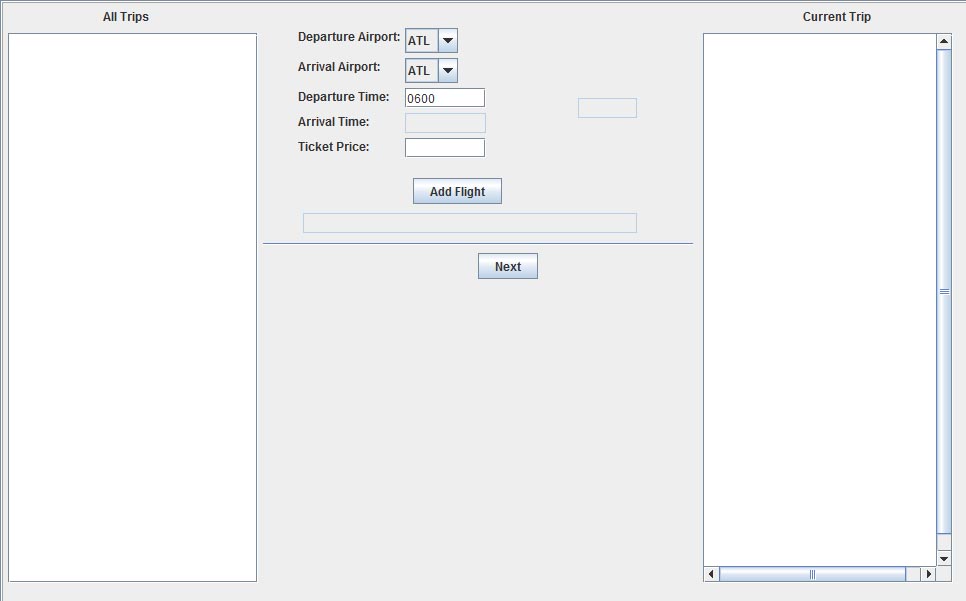
We will start by creating our first flight. When creating your flights, you can see the fields in the image above. The Departure Airport and Arrival Airport fields are drop-down boxes which contain a list of all of the airports you chose to operate at from the previous tutorial. When you change the values in this fields, the colored text box to the right will change, as well as the Ticket Price text field. The colored text box indicates the health of the market from the Departure Airport to the Arrival Airport. This is an important indicator for you, because it gives you an idea how competitive the market will be. The Ticket Price field will change to either two values. If you already have other flights in the market, it will automatically set to the average value of all of your flights in that market. If you do not have any flights in the market, it will set to a historical average price. This number is provided to give you a general idea of how expensive the ticket price for the flight would be in real life. The historical price will usually not guarentee a profit for the flight, due to several factors the simulation engine takes into account. It is advised to set your ticket price above the historical average price.
Also on this small form are the Departure Time and Arrival Time text fields. The Departure Time field is for you to indicate what time you want the flight to depart. This number is in military form, meaning the numbers range from 0000 to 2359. The first two digits indicate the hour in the day (between 0 and 23), and the second two digits indicate the minutes in the hour (between 0 and 59). The Arrival Time text field is not an editable field. The arrival time for the flight is automatically calculated based on your departure time and the length of a flight between the Departure and Arrival Airports, and adjusted for timezone changes.
Under these fields are two buttons and an uneditable text field. To button labeled: "Add Flight" will add the flight you specified in the form to the list on the right, and will automatically adjust some of the values in your form to assist you in creating your next flight. The uneditable text field will display brief status messages, such as successes or failures when performing different operations. The last button is labeled: "Next" and will take you to the next form, which will allow you to set your trip's plane and finalize the trip creation process.
For this tutorial, our first flight will go from ATL to JFK, departing at 6am (ATL time), and costing $200 per ticket. We select ATL as our Departure Airport, JFK as our Arrival Airport, "0600" as our Departure Time, and "200" as our Ticket Price. We will then press the "Add Flight" button, and continue with creating the trip's second flight. After pressing the button, you will notice the flight will appear on the Current Trip list and the form will automatically change. The Departure Airport field will change to "JFK", the Arrival Airport field will change to "ATL", and the Departure Time field will change to 31 minutes after the Arrival Time of the flight you just added. These changes occur because the flights in your trip MUST connect perfectly, or you will get an error message, indicating that the trip is not valid. This means that the second flight MUST depart from the same airport the first flight arrived at, and the departure time of the second flight MUST be at least 30 minutes after the arrival time of the first flight. The Arrival Airport field changes to ATL because the last flight in your trip MUST arrive at the same airport as the first flight's departure airport. This is because each trip will fly on every day, and the plane cannot depart from ATL for the first flight in the trip if the trip ended at some other airport (because the plane would not be located at ATL).

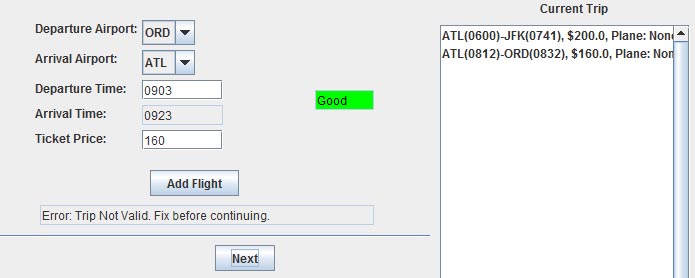
Error: Trip Not Valid

So let's say you tried to add ATL to ORD as your second flight in your trip, and then attempted to press the "Next" button. When you press the "Next" button, your trip is validated before taking you to the next form. If your trip is invalid, you cannot continue until you fix the problems. If the trip is invalid, you will recieve an error message which reads: "Error: Trip Not Valid. Fix before continuing". You then need to determine why your trip is invalid. For the above example, the trip is invalid because the flights do not connect. After the first flight, our plane would be located at JFK, so it would be impossible for the plane to then depart ATL for the second flight. The second flight MUST depart JFK.

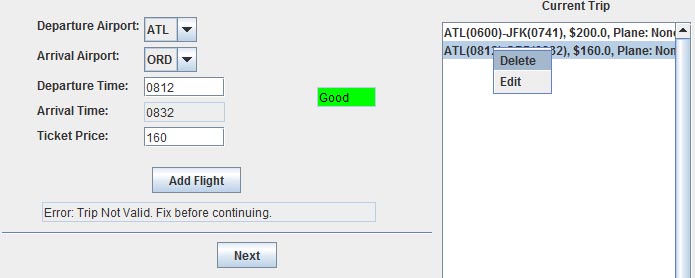
So, we need to delete the flight. To delete flights from the trip, select the flight you want to delete, right-click the flight, and press the "Delete" option. This popup also contains an "Edit" option, which we will discuss in the next section.

Editing Flights

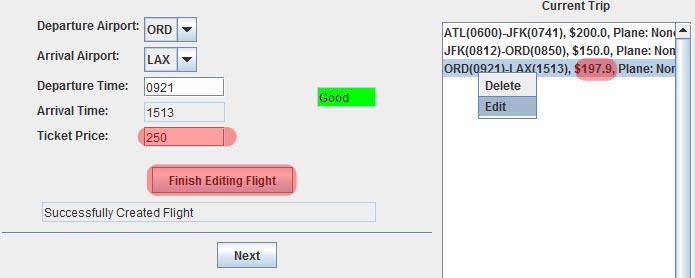
Ok, so we have started to build more of our trip by now by following the same procedure we used to create the first flight. Our first flight still goes from ATL to JFK, our second flight now goes from JFK to ORD, and our third flight goes from ORD to LAX. But, we made a mistake in the third flight: we forgot to change the Ticket Price from the historical average to the value we want to charge. Notice in the Current Trip list how the ticket price is set to: "$197.90". Instead, we want to charge $250 for a ticket on that flight. To make that change, right-click the flight like we did with the deleting in the previous section, and this time press: "Edit".

The "Add Flight" button has now changed to the "Finish Editing Flight" button, and the form fields have been set to the values for the flight we are editing. Now we simply change the Ticket Price field to: "250" and press the "Finish Editing Flight" button. The changes will be made to the flight, and the button will turn back into the "Add Flight" button, allowing you to once again add new flights to the trip.

Another Invalid Trip Error

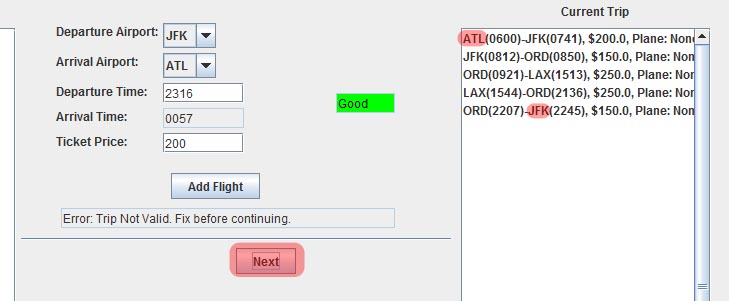
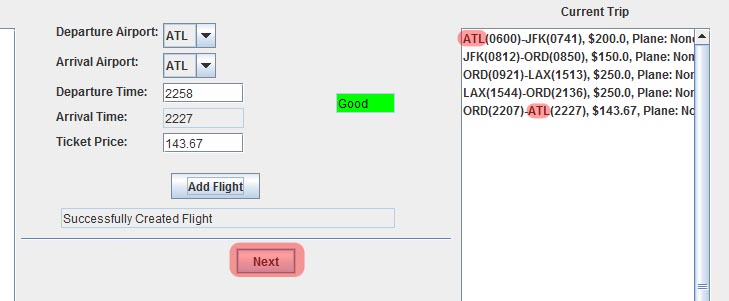
So we have now added more flights to our trip. Apart from the three in the previous section, we now also have a flight from LAX to ORD and a flight from ORD to JFK. We don't have enough time in the day to add a sixth flight, so we figure that will have to do and we press the "Next" button. But, we get the "Error: Trip Not Valid. Fix before continuing" error again. Why? It looks like we are getting the error this time because the last flight (ORD to JFK) does not connect with the first flight (ATL to JFK). To fix this issue, we are going to have to delete the last flight, and create a flight going from ORD to ATL. After doing that, our trip looks like the image below, and we are able to move to the plane selection form.

Plane Selection Form

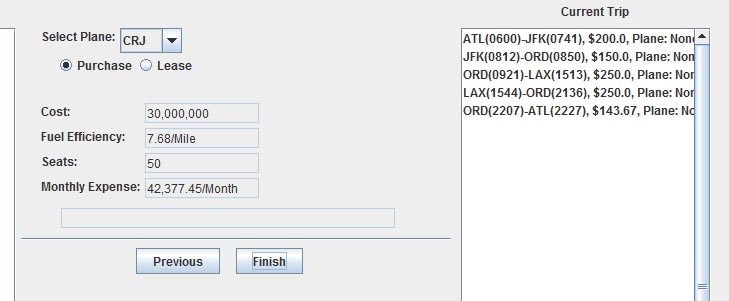
Now that our trip is valid, we are able to move on to the final part of creating our trip: selecting the plane. When you press the "Next" button in the flight creation form, it is changed to the form in the above image. The error message field is still there, but everything else has changed. The "Next" button is now the "Finish" button, and a new "Previous" button is also available. The "Finish" button will complete the trip creation process, so do not press it until you have selected the plane you want. The "Previous" button will take you back to the flight creation form, in case you want to make any additional changes.
New to this form is a "Select Plane" drop-down box, "Purchase" and "Lease" radio buttons, and a handful of other text fields you cannot edit. The "Select Plane" drop-down allows you to choose the plane you want to use for this trip. When you select a plane, the uneditable text fields are updated. These text fields display different information about the plane you have selected. The "Fuel Efficiency" field indicates the cost-per-mile for the selected plane, in dollars. The higher the cost-per-mile, the higher your expenses will be for each flight. The "Seats" field indicates the number of seats on the plane. Obviously, this tells you the maximum number of passengers each flight in your trip will be able to support. The "Monthly Expenses" field tells you the monthly cost of operating with the plane. This cost includes insurance, taxes, maintenance, ect. The "Cost" field tells you how much the plane will cost to lease or own, depending on the radio button you have selected. If you have the "Purchase" button selected, the "Cost" field will tell you how much money you will need to spend to purchase the plane. If you do not have this money available, you will have to take out a loan (if you can), or choose to instead Lease. If you have the "Lease" button selected, the "Cost" field will tell you the monthly cost of Leasing the plane. While the plane will not cost you any money upfront for Leasing, you will instead be paying a monthly fee for using the plane.
NOTE: if you have unused planes in your company (planes which have no flights using them), they will appear at the bottom of the "Select Plane" drop-down. If you have already purchased these planes, you will NOT be charged again when you attempt to use it for the trip.
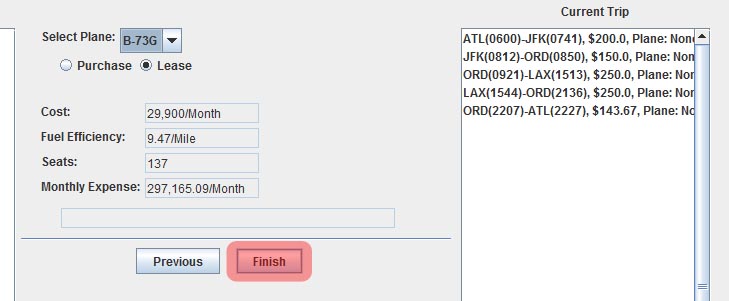
For our first trip, we will choose to lease a B-73G. When you first start your airline, you will find you HAVE to lease, since you will not have the money to purchase, and you will not have the leverage to take out additional loans. So, we select the B-73G in the "Select Plane" drop-down, select the "Lease" button, and press the "Finish" button.
NOTE: it doesn't hurt to do a bit of math to determine if we can make a profit on these flights with the given plane. We can calculate the "best-case-scenario" for our month by assuming all of our flights would be full. The plane we selected allows 137 passengers for each flight, each day. This means we can make $27,400/day in revenue on the first flight, $20,550/day on the second, $34,250/day on the third, $34,250/day on the fourth, and $19,683/day on the fifth. This would mean that the total revenue per day would come to: $136,133/day. We can find the total distance the flight travels per day would be about: 5,600 miles. Multiply that by the "Fuel Efficiency" of the plane, and we get: $53,000/day in expenses. Subtract the expenses from the revenue, and we get a daily profit of: $83,133/day. We can then multiply that by 30 days to get the monthly profit of about $2.5 million. We then need to subtract the Monthly Expense and Monthly Lease Cost to get a total monthly profit for this trip of about $2.17 million. That sounds great, but keep in mind that this was for the "best-case-scenario". In reality, you probably won't get 100% Load Factor for all of your flights, especially if there is a lot of competition.
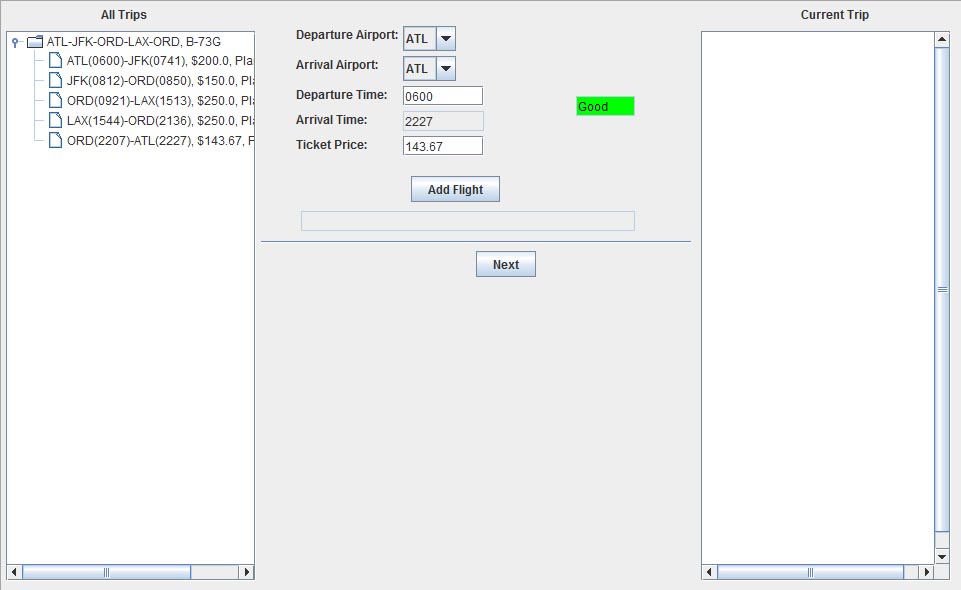
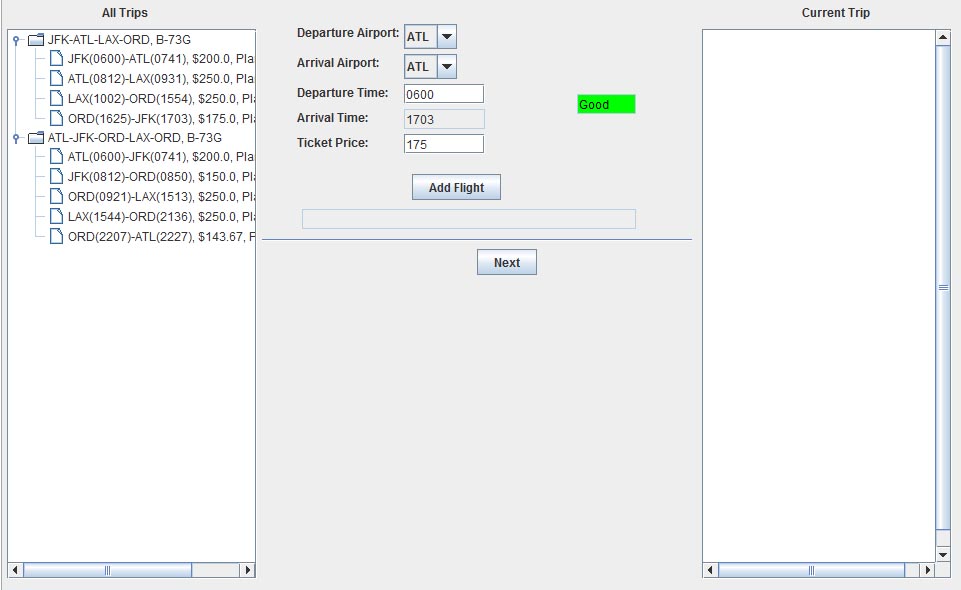
Ok, so back to creating our trip. After we press the "Finish" button, the Trip Management Screen will look like the above image. Notice how the trip we just created is in the "All Trips" list, and you can view each individual flight.
Our Second Trip - Editing, Duplicating, and Deleting

So now that we have created our first trip, we should create another. Trips mean profit, so more trips should mean more profit, provided they are designed correctly. For our second trip, we will create flights from JFK to ATL, then ATL to LAX, then LAX to ORD, and then ORD to JFK. I will skip the instructions for all of that since it is the same as the first trip, and go directly to the plane selection form.

We will select another B-73G and press the "Finish" button again. Once we do that, our Trip Management Screen would look like the below image.

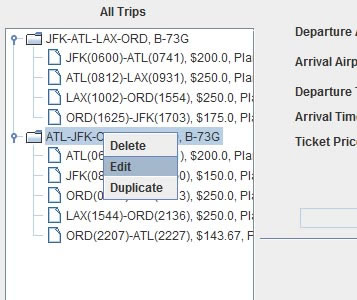
Now, let's say we want to change the plane of our second trip. In order to do that, we first have to enable trip editing. In order to do that, select the second trip and right-click. You will get a list of options like you did with the flight list.

The first option is "Delete". It does what you expect: it deletes the trip. The second option is "Edit". This will enable the trip editing feature. The last option is "Duplicate". This will create a new trip with all of the same flights. It will take you directly to the plane selection screen, because you will need to still provide the duplicated trip with a new plane.

To change the plane on our second trip, press the "Edit" option. You can make changes to the flights the same way you did earlier. You can add flights, remove them, ect., as long as the trip is still valid at the end. For our purposes, we will just press the "Next" button to take us to the plane selection form.


When we get to the plane selection form, you will notice it has changed a lot since when we were just creating trips. It now contains a second column of fields and two labels: "New Plane" and "Old Plane". This plane selection form allows you to change the plane for the trip. The "New Plane" column tells you the details for the plane you have selected, while the "Old Plane" column tells you the details for the plane the trip is currently using. You can use this information to easily compare the trip's new plane with the one you are replacing. Once you have decided on the trip's new plane, press the "Finish" button to finalize the trip editing.

Next